
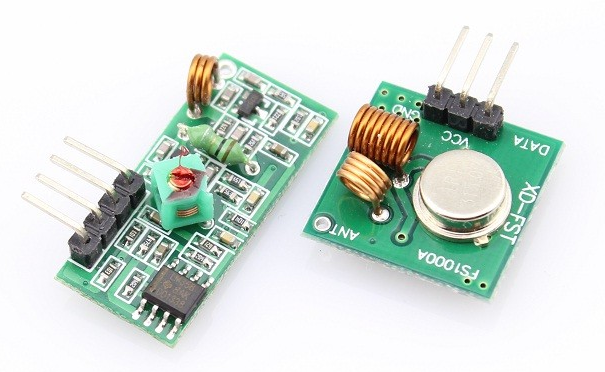
Recently I taught a brief, three hour long, Arduino 101 course to some fellow members of the Western North Carolina Linux Users Group (WNCLUG). One of the three lessons in the course was for the students to pair off and use inexpensive Chinese 433 megahertz radio modules to send data between an Adruino Uno with a FS1000A transmitter running transmitter code and another Adruino Uno with a MX-RM-5V receiver running receiver code. We talked about applications using a transceiver but these radios were discrete transmitters and receivers, NOT transceivers. Of course that was understandable because this transmitter and receiver set only cost 88 cents (in bulk), including shipping from China via AliExpress.

FIG 1: Cheap ASK Radios
Recently, I got to thinking – it seemed to me that I could use the two boards (FS1000A & MX-RM-5V) with a single Arduino to create an 88-cent transceiver through software. Consequently, I wrote some code that does just that is explained herein.
With the two radio modules in close proximity of the single controlling Arduino, such as on the same breadboard, I was concerned about the transmitter swamping the companion receiver during transmit, and possibly producing spurious results in the receiver. I decided to use the oft recommended RadioHead Arduino ASK library for this project. It can be downloaded from its author – airspayce.com/mikem/arduino/RadioHead/
RadioHead has a useful Push To Talk (PTT) feature that I opted to use to control receiver’s power. The PTT feature is intended to control a genuine transceiver but I use it to toggle on/off the power for the MX-RM-5V receiver. I invert the pin in software such that power is removed from the receiver when the transmitter is keyed. The receiver MX-RM-5v Working current at 5V is a nominal 4ma and the Arduino can source DC Current per I/O Pin at 40.0 mA, so powering the receiver via an Arduino works without issue.
I cobbled together a simple test of the software with two breadboards (see Fig 2). The serial ports were each monitored on my desktop and a laptop. Fig 3, below shows two-way messaging between the two pseudo transceivers.

Fig 2: Two pseudo Transceivers
While I have tested these cheap ASK radios at over 50 feet, I have read reports by others that they will work much, much further. These particular radios are test rejects from a bulk order made for my class and they won’t work much further than a foot apart. Someday I may try to tune the suspect receiver.

Fig 3: Test Results – two screens
Below, in Fig 4, I show the wiring for my tests – both breadboards are wired identically and run the same code.

Fig 4: Pseudo Transceiver Wiring
UPDATE: January 30, 2017 – I tested a different, higher rated radio with the exact setup and code, EXCEPT that I only tested one-way communications – because I was testing the radios, not the code. I tested the STX882 / SRX882 radio pair shown in Figure 5, below, and they worked well. Ok, not these two because I haven’t soldered the antennas onto these yet – it was another pair. I did not test maximum range but they worked across the table – see Figure 6, below. Their manufacturer, NiceRF, claims an effective range of 100 meters.

Fig 5: STX882 and SRX882

Fig 6: Test Communications with STX882 and SRX882
The source code can be downloaded from: http://pastebin.com/kv2wyWjv and is also shown below. NOTE: Source code updated on December 26, 2016.
/*
  ask_rxtx.ino - V2
  AUTHOR: Edward Comer, USA
  Open Source Licenesed under Creative Commons Attribution 4.0 International (CC BY 4.0)
  See: https://creativecommons.org/licenses/by/4.0/
  ------------
  Uses RadioHead library for messaging via a simple ASK transmitter and
  receiver, i.e., FS1000A and MX-RM-5V, etc.

  For RadioHead information, see:
  http://www.airspayce.com/mikem/arduino/RadioHead/classRH__ASK.html#details
  ------------
  Controls both transmitter AND receiver
  Receiver is powered by inverted PTTPIN, which powers down receiver when
  transmitting in order to prevent swamping the receiver.
  Receiver MX-RM-5v Working current:≤5.5mA (5.0VDC) nominally 4ma
  Arduino DC Current per I/O Pin: 40.0 mA

   +-------+   +---------+
   |FS1000A|   |XD-RF-5V |
   |D 5 G  |   | 5 D  G  |
   ++-+-+--+   +-+-+--+--+
    | | |        | |  |
    | + +        | |  +
    |            | |
  +-+------------+-+--+
  | 1            1 1  |
  | 2            0 1  |
  |    ARDUINO        |
  +-------------------+
*/

#include <RH_ASK.h>
#include <stdint.h>
#include <SPI.h> 	// Not actually used but needed to compile

#define SPEED 2000  // The desired bit rate in bits per second
#define RXPIN 11    // The pin that is used to get data from the receiver
#define TXPIN 12    // The pin that is used to send data to the transmitter
#define PTTPIN 10   // Push To Talk pin
#define PTTINVERTED true // true = LOW when transmitting, otherwise HIGH

RH_ASK driver(SPEED, RXPIN, TXPIN, PTTPIN, PTTINVERTED);

char kbdbuf[RH_ASK_MAX_MESSAGE_LEN];
char rxbuf[RH_ASK_MAX_MESSAGE_LEN];
uint8_t rxbuflen = sizeof(rxbuf);

const int ledPin = 13; // onboard LED

void setup()
{
  digitalWrite(ledPin, HIGH);
  Serial.begin(19200);
  while (!Serial); // Wait for serial connect
  if (!driver.init())
  {
    Serial.println("Radiohead driver.init failed - system halting");
    while (true) {}  // do nothing further until reset
  }
  digitalWrite(ledPin, LOW);
  Serial.println("");
  Serial.print("Maximum message length requested of this Driver is ");
  Serial.print(RH_ASK_MAX_MESSAGE_LEN);
  Serial.println("");
  Serial.print("Maximum message length available in this Driver is ");
  Serial.print(driver.maxMessageLength());
  Serial.println("");
  Serial.println("Setup complete.");
  Serial.println("");
  Serial.println("Enter New message: ");
}

/*
   loop, contstantly checking for either a string to transmit or
   a received string. This loop is predominantly non-blocking. The receiver
   is powered down when the transmitter is sending to prevent swamping the
   receiver. Power down/up is accomplished by powering the receiver with
   the RadioHead PTT pin (pin 10). The receiver uses 5V @ 4ma and the
   Arduino can source 40ma.

   NOTE: There is no immediate local echo of characters typed
*/
void loop()
{
  if (readline(Serial.read(), kbdbuf, RH_ASK_MAX_MESSAGE_LEN) > 0)
  {
    Serial.print("You entered: [");
    Serial.print(kbdbuf);
    Serial.println("]");
    // Now, Send user typed string via radio
    driver.send(kbdbuf, strlen(kbdbuf));
    driver.waitPacketSent();
    Serial.println("Transmit complete");
    delay(500);  // settling time for RX turnon
    memset(kbdbuf,0,sizeof(kbdbuf));
  }

  // Check for data received via radio
  if (driver.recv(rxbuf, &rxbuflen)) // Non-blocking
  {
    // Message with a good checksum received, dump it.
    //driver.printBuffer("Received:", buf, QtyRead);
    Serial.write(0x07); // Ring bell on Putty console
    Serial.print("Received: ");
    Serial.println(rxbuf);
    Serial.println("-------------");
    memset(rxbuf,0,sizeof(rxbuf));
    rxbuflen = sizeof(rxbuf);
    Serial.println("Enter New message: ");
  }
}

/**
   Non-blocking string read from terminal
   name: readline(int readchar, char* buffer, int len)
   @param readchar is the character read
   @param buffer is storage for accumulated string
   @param len is maximum length input string allowed
   @return returns length of string read, otherwise negative value

   Inspired by Majenko's Hardware Hacking Blog
   http://tinyurl.com/hmb8vwa
*/
int readline(int readchar, char* buffer, int len)
{
  static int pos = 0;
  int ret_pos;

  if (readchar > 0) {
    switch (readchar) {
      case '\r': // Terminate with CR or LF
      case '\n':
        ret_pos = pos;
        pos = 0; // Reset position index ready for next entry
        return ret_pos;
      default:
        if (pos < len - 1) {
          buffer[pos++] = readchar;
          buffer[pos] = 0;
        } else {	// else buffer is full
          buffer[pos] = 0;
          ret_pos = pos;
          pos = 0; // Reset position index ready for next entry
          return ret_pos;
        }
    }
  }
  // No end of line has been found, so return -1.
  return -1;
}
